 Parece que você prefere português. Deseja ver esta página em português?
What Spec-Driven Development is, what OpenSpec is, what my casadei schema changes, and the whole environment built from scratch: Node, the OpenSpec CLI, the schema and Claude Code in VS Code.
This is the first post in a series that teaches Spec-Driven Development (SDD) with OpenSpec, from scratch, by building a real project: SkyLedger BR, a Java and Spring Boot platform that uses Brazil’s civil aviation authority (ANAC) open data to study flight delays. Throughout the series we will go through the full OpenSpec cycle several times (explore, propose, apply and archive), always with Claude Code as the agent.
Posts in the series:
- SDD with OpenSpec, Part 1: OpenSpec, the casadei Schema and Claude Code (you are here)
- SDD with OpenSpec, Part 2: SkyLedger BR and the Local Infrastructure
- SDD with OpenSpec, Part 3: SkyLedger’s Spring Boot Skeleton
- SDD with OpenSpec, Part 4: Ingesting ANAC’s Open Data into SkyLedger
- SDD with OpenSpec, Part 5: SkyLedger’s Flight Query API
This first post has two halves. The first is conceptual: what problem SDD solves, how OpenSpec organizes the work, and what openspec-casadei, the schema I maintain, adds on top of stock OpenSpec. The second is hands-on: install everything, create the project, activate the schema and set up Claude Code, ending with Claude Code ready for the first conversation about the project.
I recorded every step. The videos are sped up during the waits (long typing, idle screens), so the time you see is not the real time.
The problem: the agent starts coding too early
You ask a coding agent for a feature and it starts writing code right away. Along the way it infers the requirements on its own, and those guesses are never written down anywhere. Review only happens at the diff, which is the most expensive place to find out an assumption was wrong, because the code already exists. The classic outcome is code that compiles, passes the tests and solves a subtly different problem from the one you asked for.
The sentence that sums it up for me: the expensive mistakes are decided before the first line of code, but they only become visible after it.
Spec-Driven Development is the answer to that. Instead of going straight from idea to code, we put a written, agreed specification in between: why, what the system must do, how it will be built and in what order. A person reviews all of it before the agent implements anything.
What OpenSpec is
OpenSpec is an open-source tool that turns this idea into a concrete workflow. The definition I use: a workflow that puts an agreed, written spec between the idea and the code.
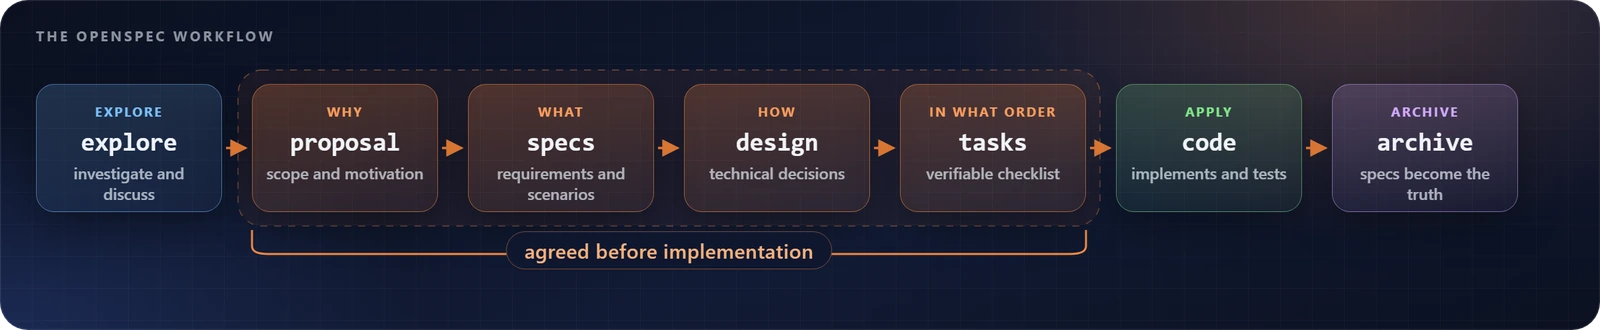
Four terms show up all the time, and they are worth memorizing:
| Term | What it is |
|---|---|
| Change | One unit of work in flight: a folder with proposal, specs, design and tasks |
| Capability | A named slice of behavior, such as user-auth. It becomes a folder under specs/ |
| Spec | The durable contract for a capability: requirements and scenarios |
| Delta | What a change adds, modifies, removes or renames relative to today |
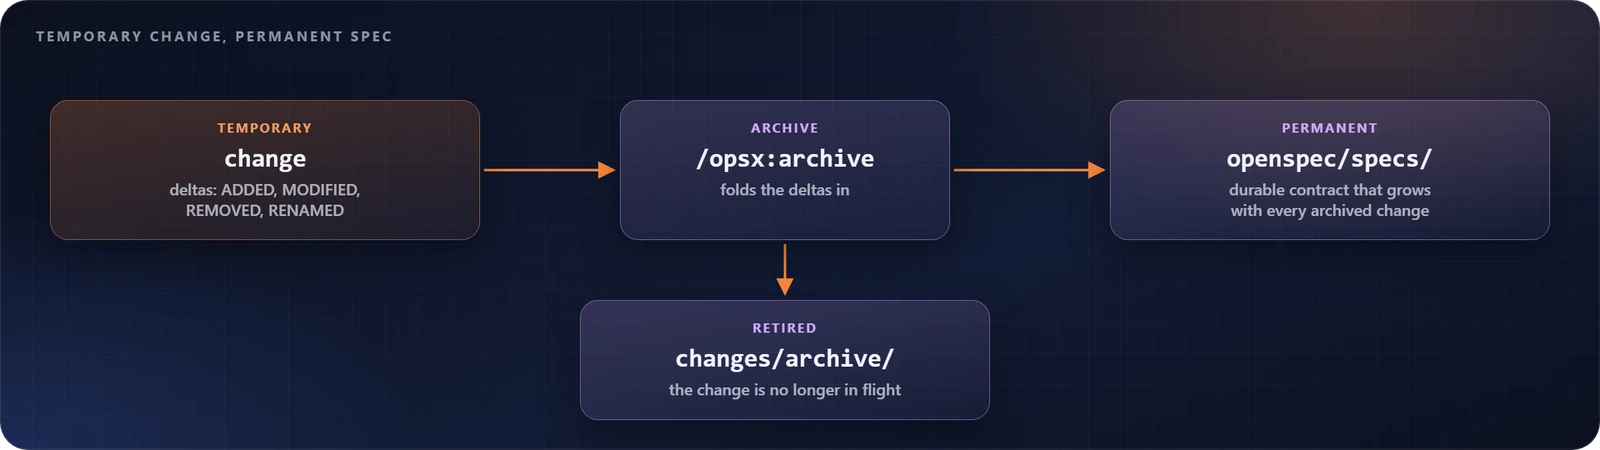
The most important distinction: a change is temporary and gets archived; a spec is permanent and accumulates. That is what stops documentation from rotting, because it becomes a by-product of the work itself.
Delta-first: why it works on legacy code
A change never describes the whole system, only what moves. The delta headers are literally these:
## ADDED Requirements      # behavior that did not exist before
## MODIFIED Requirements   # changed behavior (full updated content)
## REMOVED Requirements    # retired (needs Reason + Migration)
## RENAMED Requirements    # name change only (FROM:/TO:)
This defuses the most common objection (“my system has 80,000 lines and zero documentation”): the specs/ folder starts empty and fills in only where changes land. An empty specs/ folder on a legacy repo is the correct starting state, not technical debt. SkyLedger BR is a new project, but the workflow is exactly the same.
What openspec init creates
your-project/
|-- openspec/
|   |-- config.yaml            # schema choice + project context & rules
|   |-- specs/                 # durable capability specs (grows over time)
|   |-- changes/               # work in flight
|   |   |-- add-dark-mode/     #   proposal.md, specs/, design.md, tasks.md
|   |   `-- archive/           #   completed changes land here
|   `-- schemas/               # project-local custom schemas (optional)
`-- .claude/                   # slash commands + skills for your AI tool
All plain text, versioned with the code, and reviewed in a pull request like any other file.
The four artifacts
Each change has up to four artifacts, and each one answers a question:
| Artifact | Question | Note |
|---|---|---|
proposal.md |
Why, and what changes? | Short. The Why section is one or two sentences |
specs/<capability>/spec.md |
What must the system do? | The contract. One per capability |
design.md |
How will it be built? | Only when the change earns it |
tasks.md |
In what order, verified how? | Machine-read: apply parses the checkboxes |
The dependencies between them are declared in the schema: specs and design depend only on the proposal (they are siblings), and tasks depends on both.
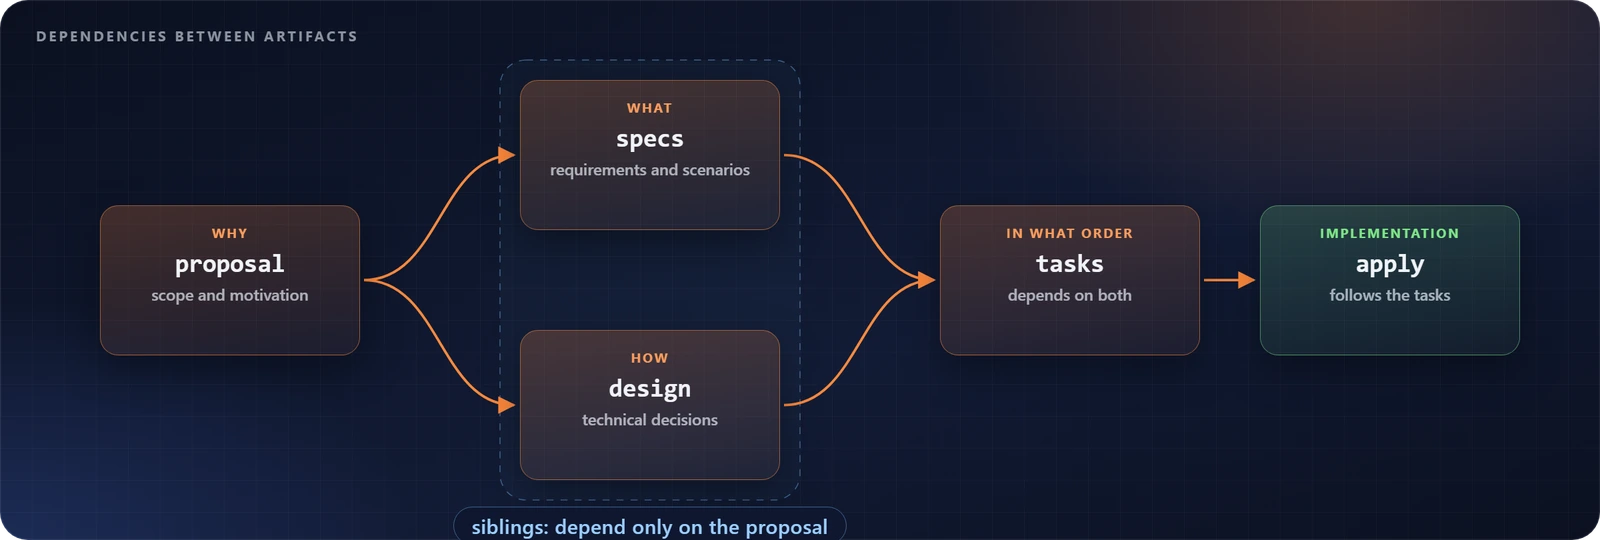
Each artifact has a template (the skeleton written to disk) and an instruction (the prose the agent reads while filling it in). Both live in the schema, and that is what you customize. Keep this in mind, because it is what explains the casadei schema later on.
A few spec.md rules really bite, and knowing them up front saves hours of debugging:
- A scenario uses
#### Scenario:with exactly four hashes. With three, or with a bullet, it fails silently: the scenario simply does not exist for the parser. - The requirement body must contain
SHALLorMUST. The check reads the body, not the title. It is a warning normally and a fatal error underopenspec validate --strict. - Every requirement needs at least one scenario.
- A spec says what the system does, never how. If the implementation could change without changing visible behavior, it does not belong in the spec.
The change lifecycle
| Stage | What happens | Command |
|---|---|---|
| Explore | Think it through with the agent, against the real code, before committing | /opsx:explore |
| Propose | Create the change and draft the artifacts | /opsx:propose |
| Validate | Structural check of deltas and requirements | openspec validate |
| Apply | Work through the task list, ticking checkboxes | /opsx:apply |
| Archive | Fold the deltas into specs/ and retire the change |
/opsx:archive |
Archive is the step most people skip, and it is precisely what makes the spec durable. Without archive, changes pile up and nothing gets consolidated.
Explore is the step I recommend most and that almost nobody uses. AI assistants are eager: ask something vague and they will confidently build something. Explore is a no-stakes conversation in which you and the agent work out the right move before any artifact exists. It reads and searches the code, compares options and their tradeoffs, draws diagrams and narrows a vague idea down to a buildable scope. Just as important, it does not write code, does not touch the schema and does not start a change on its own. Rule of thumb: the fuzzier the task, the more explore pays off. If you already know exactly what you want and how, go straight to propose. In Part 2 you will see explore in action over the whole of SkyLedger BR.
CLI and slash commands: two different things
This is a common mix-up. There is the CLI, which you run in the terminal:
openspec init --tools claude     # set the project up (new OR legacy)
openspec list --specs            # what the project ALREADY covers
openspec list                    # what is in flight right now
openspec show "user-auth" --type spec       # read a capability
openspec validate --all          # structural check
openspec validate <change> --strict         # warnings become failures
openspec archive <change>        # fold deltas into specs/, retire the change
And there are the slash commands, which you type in the agent’s chat: /opsx:explore, /opsx:propose, /opsx:apply, /opsx:archive, plus /opsx:update (revise an in-flight change after feedback) and /opsx:sync (reconcile specs with reality when code changed outside the workflow). Six more workflows are off by default (new, continue, ff, bulk-archive, verify and onboard), and you enable them with openspec config profile.
Slash commands are instructions for the agent. What actually reads and writes the structure on disk, validates it and decides which schema is active is the CLI. That is why it gets installed first. And because it is an ordinary command-line tool, the same openspec validate --strict you run on your machine can run in a CI pipeline.
The casadei schema: what it changes from stock
OpenSpec is deliberately neutral about engineering practice, because it has to serve any team. That is not a flaw, it is by design. But I wanted my rules inside the workflow instead of depending on someone remembering them during review. That is where openspec-casadei came from.
The architectural decision that shapes everything else: it is a fork of the schema only, not of the CLI. You install the npm package as usual, and it resolves my schema through the override tiers that OpenSpec itself documents. No build, no internal package, no TypeScript to maintain. The repo keeps the original schemas/spec-driven/ untouched on purpose, as a control group: it is what my changes are measured against.
git diff --no-index schemas/spec-driven schemas/casadei
At the time of writing, the fork’s README reports +406 lines and −17, across 5 files: almost entirely additive. The artifact graph is the same as stock (proposal → specs and design → tasks); no artifact was added, removed or reordered. It is a content change, not a behavior change.
The main differences
| Area | Stock OpenSpec | casadei schema |
|---|---|---|
| Scenario format | **WHEN** / **THEN** |
Required **AS A** actor line |
| Scenario coverage | Happy path is enough | A failure or edge case is expected too |
| Breaking changes | Mark with **BREAKING** |
Must also state the deprecation path |
| Dependencies | No position | Named in Impact and approved by the user |
design.md |
Context, Goals, Decisions, Risks | Adds Migration Plan, Security & Observability, Open Questions |
| DB migrations | No position | Expand-and-contract, with a tested down |
| Tests | Each task group lands its own tests and docs | Also: a mandatory test per feature or fix, mapped to its BDD scenario, and a coverage threshold in Quality Gates |
/docs/ |
No position | Updated in the same commit, in Brazilian Portuguese |
| Git and commits | No position | Conventional Commits, branch naming, nothing straight to main |
| Authorship | No position | Human author only, no AI co-author trailers |
| Docblocks | No position | Required on every exported symbol |
| Quality gates | No position | Build, lint, static analysis and types before review |
Notice that almost every row in the middle column says “no position”. The fork exists precisely to take one.
Scenarios gain an actor and a failure case
This is the difference you notice most day to day. In stock OpenSpec, one happy path satisfies the validator. In casadei, every scenario names who acts, and each requirement covers at least the failure a caller can actually hit:
#### Scenario: Successful export
- **AS A** signed-in account holder
- **WHEN** I click the Export button
- **THEN** the system downloads a CSV file with all my data

#### Scenario: Export requested while one is already running
- **AS A** signed-in account holder
- **WHEN** a previous export is still running
- **THEN** the system SHALL return the in-flight export, not start a second
The reason: a scenario with no actor tends to drift into describing implementation (“WHEN the system processes the queue”). And a technical detail that makes this safe: OpenSpec never parses WHEN or THEN, it only counts the four hashes. So adding AS A breaks nothing in the validator.
Specs carry resilience, LGPD and observability
In casadei, idempotency, retry ceilings and DLQs are contract-level, so they go in the spec, not buried in the design. “It retries” is not a contract; “at most 5 attempts, then export-dlq” is. The same goes for LGPD, Brazil’s data protection law: the retention window is stated explicitly (“retained indefinitely” is not a retention policy), no personal data (CPF, RG, e-mail, phone, tokens) in logs, metrics or telemetry, and correlation IDs and OpenTelemetry propagation wherever a consumer relies on them.
BREAKING needs a way out
In stock OpenSpec, marking **BREAKING** is the entire requirement. In casadei, the entry must say what keeps working, for how long, and what consumers move to. A **BREAKING** without a deprecation path is treated as incomplete.
Design and tasks
design.md gains three conditional sections: Migration Plan when the change alters the database (expand-and-contract in separate steps, and a down migration that actually works), Security & Observability when secrets, personal data or tracing are involved (each secret is named along with where it lives in each environment, never by value), and Open Questions when something is genuinely deferrable. A feature flag without a removal criterion is debt.
In tasks.md, each group lands its own tests and documentation before the next group builds on it. There is no trailing “Tests” group, because a test group at the end is a test group that never happens. The last group, Quality Gates, is whole-branch verification only: build, lint, types, coverage.
How the agent writes code
During /opsx:apply, rules apply that stock OpenSpec does not have: follow the project’s conventions, not the agent’s habits; no premature abstraction (an abstraction must name the second use case that justifies it); no new dependency without asking; minimal diff, no drive-by reformatting; docblocks on exported symbols; and comments only when they explain why. It also finds out how the project tracks work (JIRA or GitHub Issues), asking instead of inventing a ticket ID.
Where a rule lives decides when it applies
I learned this one the hard way. An instruction only binds while it is in the agent’s context. The schema’s apply instruction is only in context during an /opsx:apply run. If you just say “commit this”, outside the workflow, that instruction was never loaded. The agent did not disobey: it never saw the rule. That is exactly what happened to me with the rule about not adding AI co-author trailers to commits.
That is why the authorship rule lives in more than one place:
| Where | Covers | Installed by |
|---|---|---|
The schema’s apply.instruction |
Any /opsx:apply run in a project carrying the schema |
the schema itself |
~/.claude/CLAUDE.md |
Every session on your machine, in any project | install --user |
<project>/CLAUDE.md |
Every session in that repo | install --project --claude |
The installer also has a --secrets medium|high option that adds tooling to the project that enforces the secret rules: a block of ignore rules in .gitignore, a gitleaks pre-commit hook and a GitHub Actions workflow that scans the history; at high, also an openspec/secrets-policy.md. I did not use it for SkyLedger BR, but it is worth knowing about.
And the principle that holds for any customization: customize at the smallest level that works. config.yaml for one repo, a schema for your way of working, a schema repo to share it. In SkyLedger BR we use the first two: the casadei schema for what always applies, and config.yaml for what is true only of this project.
Hands-on
What we are going to set up in this second half:
- Node.js and the OpenSpec CLI, installed globally through npm.
- The openspec-casadei repo, cloned once, somewhere permanent. It is the source of the schema, not the project.
- The
skyledger-brproject, withgit init,openspec initand the casadei schema installed inside it. - Claude Code in VS Code, installed, logged in and in Manual mode, ready for the first conversation about the project.
I used VS Code with a bash terminal (Linux). The macOS commands are the same; for native Windows, the schema’s README has the PowerShell equivalents, and I quote some below.
Step 1: check Node
The OpenSpec CLI ships through npm and requires Node.js 20.19.0 or newer. Note that Node is a tooling dependency here, not a product one: SkyLedger BR will be Java with Spring Boot, and Node is only on the machine because of the CLI.
node --version
git --version
In the recording, VS Code opens on the working folder, still empty. The chat panel open on the right (“Build with Agent”) is VS Code’s own assistant, not Claude Code; I close it to avoid confusion. node --version answered v24.21.0, with room to spare.
⏱ Real time: 25 s (video sped up).
If Node is missing or too old, the schema’s README suggests:
# macOS
brew install node

# Linux (Debian/Ubuntu): distro packages are often too old, so use nvm
curl -o- https://raw.githubusercontent.com/nvm-sh/nvm/v0.40.1/install.sh | bash
nvm install --lts
# Windows
winget install OpenJS.NodeJS.LTS
Why check this first? Because in a moment Claude Code will run commands in the same terminal I use. If Node is on an old version, the error shows up in the middle of a task, often in a confusing way. Checking first costs ten seconds.
Step 2: install the OpenSpec CLI
npm install -g @fission-ai/openspec@latest
openspec --version
-g means a global install: the openspec command works from any folder. In the recording the output was added 70 packages in 8s, followed by a notice from npm itself about a new version of npm (11.19.0 to 12.1.0). That notice is about npm, not OpenSpec, and you can ignore it. openspec --version answered 1.13.2, the version used throughout the series. If you install today you will probably see a newer one.
⏱ Real time: 22 s (video sped up).
If you get openspec: command not found, npm’s global bin folder is not on your PATH. npm prefix -g prints where the package was installed, and the bin folder there needs to go on the PATH.
Step 3: clone openspec-casadei
The schema lives in a public repo that you clone once, somewhere permanent. You come back to it to install the schema into new projects and to pull updates. The commands from the README:
# macOS / Linux
mkdir -p ~/workspace && cd ~/workspace
git clone git@github.com:vcasadei/openspec-casadei.git
cd openspec-casadei
# Windows (PowerShell)
mkdir $env:USERPROFILE\workspace -Force
cd $env:USERPROFILE\workspace
git clone git@github.com:vcasadei/openspec-casadei.git
cd openspec-casadei
The clone above uses SSH. Since the repo is public, if you do not have an SSH key set up on GitHub, cloning over HTTPS works just the same: git clone https://github.com/vcasadei/openspec-casadei.git.
Inside it, the folders that matter are schemas/, home to casadei and the original spec-driven, and tools/, where the installer we are about to use lives. This repo follows the pattern OpenSpec itself documents for shared schemas: a dedicated, versioned repository that projects simply install from. An improvement to the schema is made once, with a history of who changed what and why.
Step 4: create the project and run openspec init
Now SkyLedger BR is born. I kept the project next to openspec-casadei, in the same working folder, so both show up in the same VS Code Explorer:
cd ~/workspace
mkdir skyledger-br && cd skyledger-br
git init
openspec init
Interactive openspec init shows the “Welcome to OpenSpec” screen, explains it will set up Agent Skills and workflow commands, and lists the supported AI tools across three pages (Codex, Cursor, Gemini CLI, GitHub Copilot and many more). I ticked Claude Code. To skip the prompt, use openspec init --tools claude, which does the same thing.
There is a slip of mine in the recording: I created the folder as skiledger-br, with an “i”. It shows up that way in the Explorer, and I fix the name later, before installing the schema.
⏱ Real time: 43 s (video sped up).
One caution: do not pass --language pt-BR to init. That flag makes OpenSpec write spec artifacts in Portuguese, while the casadei schema deliberately keeps specs in English (the validator’s SHALL/MUST check only works in English) and requires the /docs/ folder in Brazilian Portuguese. That split is already handled in the schema’s instructions.
Step 5: read the init output (and shell completion)
The init summary says what it created:
Created: Claude Code
6 skills and 6 commands in .claude/
Config: openspec/config.yaml (schema: spec-driven)
Below it comes the suggestion to start with /opsx:propose and the note about the six extra workflows. The line that matters is the config.yaml one: OpenSpec always starts with the generic schema, spec-driven. It works, but it knows nothing about my rules: it does not require failure scenarios, it says nothing about LGPD, it does not tie tests and documentation to each task group. That is the line we are going to swap.
Init itself suggests installing shell completion, and I accepted:
openspec completion install
exec bash
⏱ Real time: 32 s (video sped up).
The first output line looks like an error: Unable to read existing completion file, with ENOENT. It is not. It only means there was no previous completion file yet, and the next line confirms it: Completion script installed and .bashrc configured successfully. It is a good example of a habit worth keeping for the whole series: read the output to the end before concluding something broke. That applies to you, and to the agent when it reads command output.
Step 6: install the casadei schema into the project
The central step. The installer runs from inside openspec-casadei, pointing at the project. Order matters: run openspec init first, so there is a config.yaml for the installer to write to.
cd ~/workspace/openspec-casadei
./tools/install.sh --project ../skyledger-br --claude
# Windows, from the openspec-casadei root
.\tools\install.ps1 -Project C:\path\to\skyledger-br -Claude
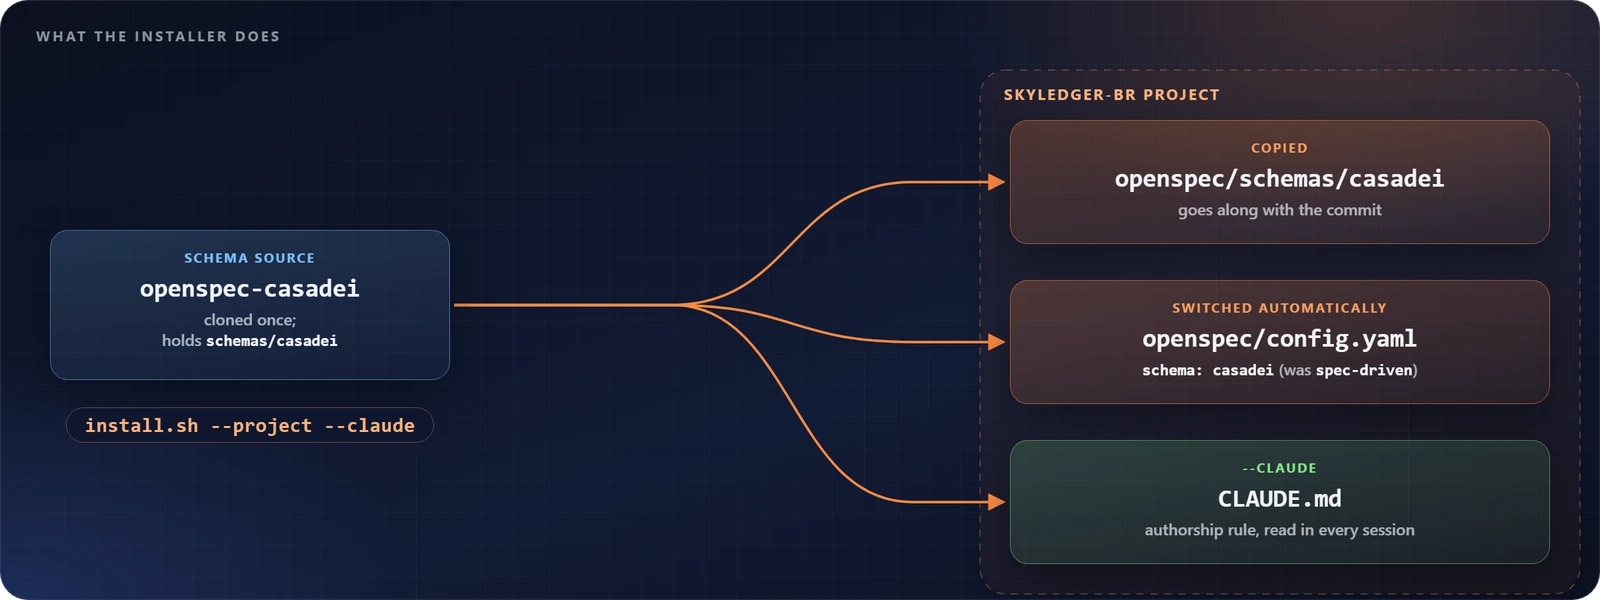
In the recording, between starting to type the command and finishing it, I rename the folder to skyledger-br, with a “y”, so the path is right from here on. The output has three lines, and each one means something:
Installed schema 'casadei'  ->  .../skyledger-br/openspec/schemas/casadei
Set 'schema: casadei' in openspec/config.yaml (was 'spec-driven')
Created CLAUDE.md with the authorship rule
- The schema was copied into the project.
config.yamlwas switched automatically, with no manual edit.- The
--claudeflag created aCLAUDE.mdwith the commit authorship rule.
And the last line suggests the check: Verify with: openspec schema which casadei.
⏱ Real time: 1 min 07 s (video sped up).
Three decisions are baked into that command:
--projectinstead of--user.--userinstalls once per machine and is invisible to anyone else working in the repo: ifconfig.yamlsaysschema: casadeiand they do not have it, their CLI errors out.--projectcopies the schema into the repo and it goes along with the commit. Anyone who clones SkyLedger BR later gets the same rules without setting anything up.--claude. Without it, the authorship rule only applies during/opsx:apply. WithCLAUDE.md, Claude Code reads the rule in every session in that repo.- No manual edit of
config.yaml. The installer only touches the top-levelschema:line, and only when it saysspec-driven. If the project already points at a different schema, it does not overwrite it; it just warns. Silently switching away from a schema someone chose on purpose would be worse than asking them to type one line.
One detail the schema’s README highlights: upstream OpenSpec’s .gitignore lists CLAUDE.md, and projects that inherited that rule may ignore the file without you noticing. The installer warns when the CLAUDE.md it wrote is git-ignored and shows the exception to add (!CLAUDE.md). In SkyLedger BR the file was committed normally.
Step 7: check which schema is active
Here I slipped again, and the mistake is instructive. I ran the check while still inside openspec-casadei:
$ openspec schema which casadei
Error: Schema 'casadei' not found
Available schemas: spec-driven
It is not a bug: the schema was installed into the project, and the CLI resolves schemas from the current folder. Inside the project, the result is the expected one:
cd ../skyledger-br
openspec schema which casadei
cat openspec/config.yaml
openspec schema which --all
Schema: casadei
Source: project
Path: .../skyledger-br/openspec/schemas/casadei
Source: project is exactly what we wanted to see. The cat shows that the first line of config.yaml is now schema: casadei, and the rest is example comments (“Project context (optional)”, “Per-artifact rules (optional)”). And schema which --all shows both side by side: casadei under Project schemas and spec-driven under Package schemas. Note the warning that the schema commands are still experimental.
⏱ Real time: 54 s (video sped up).
Two takeaways from this step:
- The installer copies files, it does not symlink. If the schema improves later, each project has to reinstall to pick up the change. That is a deliberate choice: the project’s schema stays stable and versioned with the code, and updating the process is an explicit act that shows up in history.
- OpenSpec always works relative to the folder you are in. That also holds for Claude when it runs commands.
The schema resolution order explains Source: project: OpenSpec looks first in <project>/openspec/schemas/, then in the user data folder (~/.local/share/openspec/schemas/ on Linux and macOS, %LOCALAPPDATA%\openspec\schemas\ on Windows), and last in the npm package. First match wins.
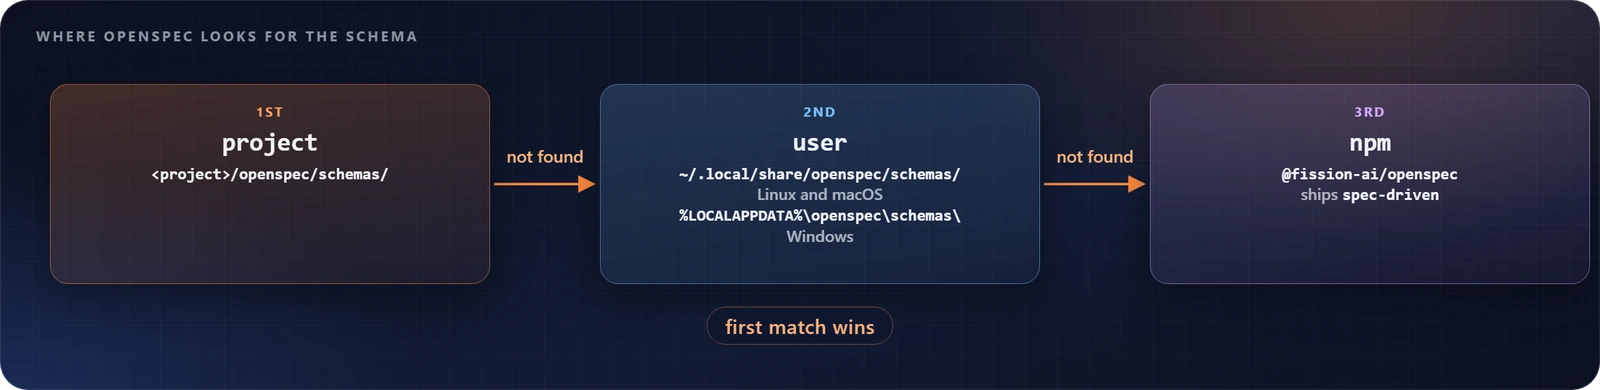
Where we are
Before opening Claude, a quick checklist of what is ready:
- OpenSpec CLI 1.13.2 installed globally through npm.
- openspec-casadei cloned: it is the source of the schema, not the project, and it stays put.
- skyledger-br created, with
git initandopenspec initusing Claude Code as the tool. .claude/folder with 6 skills and 6/opsxcommands.- Schema copied into
openspec/schemas/casadei, versioned with the code. config.yamlwithschema: casadei.CLAUDE.mdwith the authorship rule, read by Claude in every session.
What is missing is telling OpenSpec what is true about this project: the stack, the domain rules and where the data comes from. That is already specific to SkyLedger BR, so it moves to Part 2, where we write config.yaml together with Claude.
Claude Code in VS Code
Installing the extension
In VS Code’s Extensions panel, search for Claude Code and install Claude Code for VS Code, published by Anthropic, with the verified publisher badge. The badge is what tells you it is not a third-party extension with a similar name. I also installed Microsoft’s Container Tools, which VS Code itself recommended and which will come in handy when we get to the Docker infrastructure in Part 2.
⏱ Real time: 48 s (video sped up).
Once installed, the Claude icon shows up in the sidebar. The extension runs in the editor’s environment: when Claude runs a command, it uses the same terminal, the same openspec 1.13.2 and the same git we just set up. What I see in the terminal is what the agent sees. If you prefer, you can run the claude command directly in the integrated terminal; it works the same way. I use the panel because it makes it easier to follow what it is doing, step by step.
Login and first session
The first time, the panel asks “How do you want to log in?”, with three options: Claude.ai Subscription (Pro, Team or Enterprise plans), Anthropic Console (pay-as-you-go API billing) and Bedrock, Foundry or Vertex, for those using Claude through a cloud provider. I use the subscription. After login comes the account panel, with usage for the five-hour window and the Session Manager; I click New session.
⏱ Real time: 54 s (video sped up).
The session opens with the Opus 5.5 model, Medium effort, and a notice: “Auto mode is enabled”. In Auto mode, Claude assesses each tool call, runs the ones it judges lower risk and blocks the rest. The mode menu has four options: Manual (asks for approval before each edit), Edit automatically, Plan (explores and presents a plan before editing) and Auto. You can cycle through them with Shift+Tab.
Switching to Manual mode
I moved the Claude panel into the main editor area, to have room to read, and switched to Manual: “Claude will ask for approval before making each edit”.
⏱ Real time: 24 s (video sped up).
I did this on purpose. For a first contact, I want every read, search or write the agent wants to make to be visible and, where relevant, to go through me. It is not distrust: it is the same SDD principle applied at a smaller scale. OpenSpec makes sure no relevant decision happens without human review, at the artifact level; the permission mode does the same at the level of individual actions. They are complementary layers. As you gain confidence in the workflow, it makes sense to loosen this. What matters is that it is a conscious choice, not the factory default.
With the extension installed, logged in and Manual mode on, the environment is ready. The first conversation with Claude is already about SkyLedger BR, which is why it opens Part 2.
No Claude Code? A free alternative
Nothing here depends on Claude Code specifically: openspec init supports dozens of tools, and the schema is the same. If you want to practice without paying anything, I wrote a step-by-step with the same OpenSpec and the same casadei schema running on opencode with free models: Spec-Driven Development with opencode and InkStone’s Free Models. The commands change from /opsx:propose to /opsx-propose, but the workflow is the same.
Common problems
| Symptom | Cause and fix |
|---|---|
openspec: command not found |
npm’s global bin folder is not on PATH. Check with npm prefix -g. |
Schema 'casadei' not found |
Wrong folder (the CLI resolves schemas from the current folder) or wrong scope. Go into the project and run openspec schema which --all; if it is not listed, reinstall. |
| The installer warns the schema was not selected | There was no config.yaml. Run openspec init, then the installer again. |
| PowerShell refuses to run the script | Execution policy: powershell -ExecutionPolicy Bypass -File tools\install.ps1 -User. |
| I edited the schema and nothing changed in the project | The installer copies, it does not symlink. Reinstall. |
No deltas found on validate |
Wrong scenario hashes (there are four) or wrong delta headers. |
should contain SHALL |
SHALL/MUST is missing from the requirement body. Fatal under --strict. |
The series project: SkyLedger BR
SkyLedger BR is a platform that uses ANAC open data to compute flight delay risk and simulate the financial exposure of a delay reimbursement benefit. The idea behind it: many premium credit cards include “travel protection”, and whoever offers that benefit needs to know, for any route or airport, the historical probability of a delay or cancellation and how much money to set aside for it.
That framing brings together two things I wanted to exercise with SDD: financial rigor (BigDecimal, data traceability, no floating point for money) and real public data. The data comes from ANAC’s open data portal, mainly VRA (Voo Regular Ativo, active scheduled flights), with scheduled and actual times, delays and cancellations per flight, plus the list of aerodromes. So nobody has to download anything on the fly, the data lives in a separate repo, anac-data: clone it and the CSVs are already there.
The stack is the one recorded in config.yaml: Java 21, Spring Boot 4.1, Maven, PostgreSQL 16, Redis 8 and SeaweedFS. The full code is at github.com/vcasadei/skyledger-br, with a branch for each phase of each change (1-propose, 2-apply, 3-archive), so you can compare the artifacts with what I show and check out any point. main is the final state.
What the next posts build, each with its own full OpenSpec cycle:
- Part 2: local infrastructure. It starts with an
/opsx:exploreover the whole project and continues with thesetup-local-infrachange: Postgres, Redis and SeaweedFS with Docker Compose. - Part 3: Spring Boot skeleton. The
bootstrap-project-skeletonchange: an application that starts, connects to the infrastructure and answers the health check. - Part 4: ANAC data ingestion. The
add-flight-data-ingestionchange: flights and aerodromes from anac-data into the database. - Part 5: flight query API. The
add-flight-query-apichange: a REST API documented with OpenAPI, plus a search screen.
The environment is ready. In the next post we start talking to Claude about SkyLedger BR: we write the project context into config.yaml, explore the whole project and propose the first change: SDD with OpenSpec, Part 2: SkyLedger BR and the Local Infrastructure.
Series navigation: you are on Part 1 · Next: Part 2: SkyLedger BR and the Local Infrastructure →
References
- Spec-Driven Development and OpenSpec
- OpenSpec · Documentation · npm package
- openspec-casadei, my OpenSpec schema · schema customization · OpenSpec on existing projects
- Claude Code
- Environment
- The project
- Free alternative
If this series helps you get started with SDD, tell me on LinkedIn (linkedin.com/in/vcasadei) or check out other projects and writing I publish at vcasadei.com.